How to start with KeyCue

Struggling to remember keyboard shortcuts and boost productivity
Keyboard shortcuts are specific key combinations (such as Ctrl + C for copy or Command + Z for undo) that allow you to perform tasks quickly without using a mouse or navigating through menus. They can speed up workflow and improve productivity across various applications. Apple also provides a comprehensive list in its official guide.
You know that keyboard shortcuts are the key to saving time and improving workflow, but remembering all the commands can feel overwhelming, especially since every app has its own unique set of shortcuts. You waste valuable time searching for commands online or navigating through menus, which slows down your productivity and disrupts your focus.
Solution is KeyCue – Your keyboard shortcut cheat sheet
KeyCue solves this problem by acting as a comprehensive on-screen cheat sheet for all the shortcuts in your current app. With a simple trigger (like holding the ⌘ key), KeyCue instantly displays a clean and organized list of available keyboard shortcuts. This helps you learn, remember, and use shortcuts more effectively over time.
KeyCue offers additional productivity-enhancing features, including:
- Emoji table: Quickly search for and insert emojis. It is perfect for writers, marketers, and communicators.
- Custom shortcuts: Create, manage, and assign personalized keyboard shortcuts to streamline repetitive tasks in any application.
- Quick access: KeyCue provides quick access to folder contents and frequently used URLs.
- Cross-App compatibility: Works seamlessly across macOS and all popular applications, making it ideal for professionals.
See KeyCue in action and watch the videos.
What is KeyCue and how does it work?
KeyCue is a productivity tool designed to help users discover and efficiently use keyboard shortcuts on macOS. It provides a shortcut table of all the available shortcuts for the active application, making it easier to navigate and execute commands without relying on the mouse. KeyCue is particularly helpful for improving workflow efficiency, learning shortcuts in new applications, and customizing shortcut usage for advanced productivity.
How to install and set up KeyCue on macOS:
- Download and install KeyCue
To start your free trial and explore KeyCue, simply download. Upgrading to the full version can be done within the app. After downloading KeyCue, locate the installer (usually in your Downloads folder) and double-click it. Follow the on-screen instructions to complete the installation on your Mac.
- Start exploring:
After installation, KeyCue will run in the background. To access it, simply press and hold the Command (⌘) key for a moment. This will display an overlay showing all available keyboard shortcuts for the active application.
- Activate KeyCue:
During installation, you will be prompted to sign in. If you skip this step, you can log in later by opening the app, navigating to the settings menu, and selecting the "License" option. Once logged in, all features of KeyCue will be unlocked automatically.
- Login with email and password:
As soon as you purchase a license, you will receive an email with your login credentials. You can use these credentials to sign in. If needed, you can change them anytime.
Once logged in, you will have access to all KeyCue features!
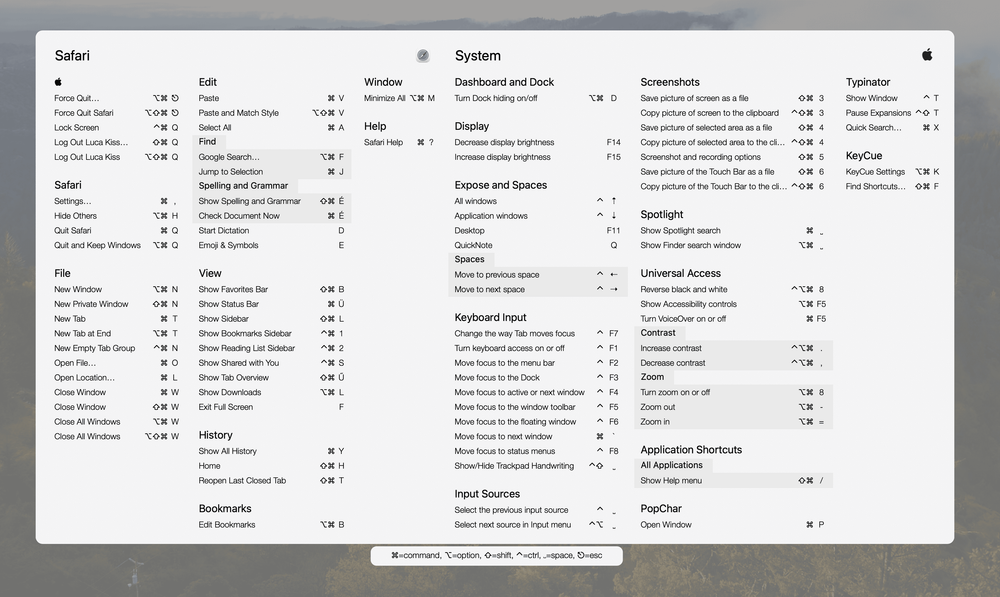
Getting to know the interface:
When you launch KeyCue by pressing the Command (⌘) key, the KeyCue shortcut table appears. On the main screen, you will see two primary sections:
- On the left side, you will find the shortcuts available for the currently active application (e.g., Safari).
- On the right side, the general macOS system shortcuts are displayed.
This makes it easy to review the shortcuts for both the active app and the system.
Before diving in, uninstall outdated drivers on Mac to prevent conflicts and boost app responsiveness.

How to search for shortcuts:
There are two ways to search for shortcuts:
-
If you know how the shortcut begins (e.g., with the Shift plus Command key): in this case, if you press the Shift and Command key, KeyCue will highlight all shortcuts on the main screen that begin with Shift + Command, narrowing down your search results.
-
If you do not know the shortcut’s key combination: Let’s say you want to take a screenshot, but you are unsure which keys to press. The solution is simple: type “screenshot” into the search bar at the bottom, and KeyCue will immediately highlight the corresponding shortcut.
These two features make it quick and easy to find the commands you need.
KeyCue Settings:
You can open the KeyCue settings in several ways:
- If the KeyCue main screen is open: You can find the Settings button in the bottom-right corner.

- Using a shortcut: Set up your shortcut to open the settings.
In the general tab of KeyCue’s settings, you can customize various aspects of the shortcut table, including its appearance and position:
Display settings: If you use multiple monitors, select whether to show the shortcut table on your main screen or a secondary display. You can also choose its position, near the mouse pointer or on a specific display for better accessibility. Additionally, customize how shortcuts are displayed: either with the command first (e.g., ⌘S) or the action first (e.g., Save).
If you need help while using KeyCue, several support options are available under the help tab, including the user guide and the technical support email. Additionally, you can explore the KeyCue Learning Center for in-depth tutorials and tips or visit the FAQs section for quick answers to common questions.
How to customize KeyCue settings for your workflow
The trigger and action settings within the activation tab are used to customize how KeyCue is activated and what it does when activated. Let's look at it in more detail:
Trigger settings:

What is a trigger?
A trigger in KeyCue is the action you use to open the shortcut table and see the list of keyboard shortcuts. It can be a single key press or a combination of keys. Think of it as a “switch” that tells KeyCue, “Show me the shortcuts now!”
Explanation of trigger setting:

-
If we look at the first trigger setting of the image, we see that the trigger is set as follows: press the Command key for almost 1 second. In the trigger, you can set different key combinations, such as Shift + Command, and how long you must hold down the keys to do the command you set.
-
In the second option, the image shows that the KeyCue icon is present on the Mac’s menu bar. According to the currently selected option, a short click is set as the activation method, meaning that if you click on the icon once with the mouse, the command will be executed. However, it is important to note that this default setting is customizable: the activation action does not have to be a short click, it can also be a long press or a right click.
In addition to customizing the click action, you can also assign so-called modifier keys to the activation. This means that you can pair the click (e.g., the short click) with one or more keys that must be pressed simultaneously to execute the action.
- In the third option, we see that the command is executed when the assigned key, in this case, the Option key, is pressed twice.
This setting is also customizable, you can assign other keys, such as Shift, Control, or Command, to be pressed twice instead.
Why customize your trigger settings?
- Customization: It can be customized to better fit your workflow, making it more aligned with your needs.
- Avoid collisions: If other applications already use common key commands, adjusting the trigger can help prevent conflicts.
Action settings:

Understanding actions in KeyCue:
In KeyCue, the action refers to what happens when a specific trigger (like a short click, long press, or modifier key) is activated. The trigger determines how you initiate a command, and the action defines what KeyCue does as a result.
The action tied to a trigger can be customized to fit your workflow best.
Explanation of action setting:
An action can be assigned to a trigger. The image below shows all 7 actions in detail.

- The first action allows you to display the KeyCue table, which shows all the keyboard shortcuts for the current application as well as system-wide shortcuts.
- The second action lets you customize your URL settings, allowing you to open your frequently used URLs.
- For the third action, you can set it to open a folder of your choice. To learn more about how to access and configure folder content with KeyCue, check out this guide.
- The fourth action automatically displays the abbreviations set up in Typinator and their expanded text. This way, KeyCue helps you quickly find and use the abbreviations you have created in Typinator, without the need to manually type out the longer text.
- When PopChar is running on your Mac, this action shows the last characters used from PopChar. The number of characters to display can be customized: for example, 5, 10, or even 30 characters. You also have the option to display your favorites by ticking the checkbox.
- If you want to quickly find the emojis you need, the 5th action is the perfect choice for you. It directly opens the emoji table, allowing you to easily search for and insert emojis.
- The last action opens the last accessed page in the KeyCue settings.
Customize your KeyCue trigger actions:
Hands-free option:
Allows you to keep the shortcut table visible without holding down a key. Normally, KeyCue displays shortcuts only while you press and hold the activation key (e.g., Command key). With the hands-free mode, the shortcut window stays open until you manually close it, making it easier to reference shortcuts while working.
Menu and system-wide shortcuts:
By enabling the menu shortcuts option and disabling others (like system-wide shortcuts and macro hotkeys), you will only see the menu shortcuts for the selected action.
However, if system-wide shortcuts are also enabled, you will see both the menu shortcuts and the general system-wide shortcuts of the macOS system. You can customize these displayed shortcuts as you like, allowing you to decide which types of shortcuts you want to see for a specific configured command.

How to change the theme in KeyCue:
In KeyCue you can customize the appearance for your needs. If you would like, you can switch between light and dark modes to best suit your work environment or current mood.
To change the theme, simply follow these steps:
- Open the KeyCue settings.
- In the settings menu, look for the Theme section.
- Here, you can choose from the available themes, such as the light and dark modes.
This feature allows you to adjust KeyCue’s appearance to match your current environment, making it even more comfortable for long hours of work.
Conclusion: KeyCue is the ultimate shortcut cheat sheet
KeyCue is a tool that provides you with complete control over your workflow, as well as a cheat sheet for keyboard shortcuts. KeyCue simplifies your experience by effortlessly providing shortcuts, helping you save time, avoiding distractions, focusing on what's, and focusing on what matters.
KeyCue ensures that every connection with your Mac is more efficient and seamless, from learning and mastering specific shortcuts to personalizing triggers and actions to fit your requirements. Additionally, it easily fits with your personal and business style thanks to features like theme personalization, custom shortcuts, and emoji pickers.
Reasons for using KeyCue right now:
- Save time: Find and use shortcuts quickly without interrupting what you are doing.
- Increase efficiency: Become an effective user quickly by learning shortcuts across all applications.
- Customize your experience: Customize themes, actions, and triggers to your preferences.
- Excellent compatibility: Works with all essential apps.
KeyCue is simple to use and install, and it offers a risk-free trial so you can test out all of its capabilities.
Using shortcuts made easy with KeyCue
There are many essential and useful shortcuts out there, you just have to use them. KeyCue is here to help.
Leer más artículos

Keyboard shortcuts on Mac OS X
Keyboard shortcuts help you save time by allowing you to never take your hands off the keyboard to use the mouse. KeyCue shows all available keyboard shortcuts.

32 best Mac shortcuts to boost your productivity
Want to speed up your Mac workflow? This article covers 32 essential keyboard shortcuts that help you navigate apps, manage windows, edit text, and handle files more efficiently. From basic commands like ⌘ + C (copy) and ⌘ + V (paste) to system functions like ⌘ + Shift + 4 (screenshot), these shortcuts save time and effort. It also introduces KeyCue, an app that displays available shortcuts instantly, making it easier to learn and use them.